The Hidden Details: Choosing the Right Fasteners for Insulated Panel Longevity

Jump to section
Insulated panels might look rock solid after installation, but it’s the little choices that decide how they last. Fasteners hide out of sight, yet they handle wind, keep water out, and hold panels snug against the structure.
When a fastener fails, the panel system usually follows. Matching the panel type and substrate with the right screw length, steel grade, corrosion coating, and washer style makes all the difference.
Stainless steel or coated carbon steel stands up to rust because the coating blocks moisture, which helps prevent leaks and loose panels. Fewer call-backs and repairs? That’s the goal.
This article digs into where fasteners go wrong and which details matter most. Let’s see how load ratings, coatings, and installation quirks play out on real jobs so every fastener actually does its job long after install day.
The “Invisible” Risk: Why Fasteners Fail in IMP Systems
Fasteners might cost less than 1% of a panel system budget, but they’re behind a big chunk of failures. Leaks, rust stains, and panel movement tend to start right where the fastener sits.
Even though you can’t see the fastener, its failure shows up quick. Insulated metal panels and structural insulated panels aren’t like single-skin sheets.
Each panel uses a sandwich build with two metal faces bonded to a foam core. This design makes the panel act as a thick, unified piece instead of a flimsy sheet.
Weight and thickness create an obvious risk. An IMP can weigh over 10–15 lb per square foot, depending on gauge and core type.
Fasteners need to handle this load. If screws aren’t rated high enough, they can bend or pull out. That’s how panels start to sag or even detach when the wind picks up.
Thermal movement is another big risk. The outer metal skin can hit over 160°F in the sun, while the inside stays much cooler.
Steel expands at about 6.5 µin/in/°F, so the two faces move at different rates. If the fastener locks both skins too tight, stress builds up and cracks coatings or seals.
Hidden or concealed fasteners add a twist. Rear-mounted systems look cleaner, but they depend on precise anchor placement and torque control.
Small installation mistakes can stay buried until water sneaks in at the joint. Common fastener failure causes include:
- Carbon steel screws used outside, leading to corrosion
- Wrong washer materials that lose compression over time
- Over-tightening that crushes the foam core and weakens the grip
Anatomy Of The Perfect Fastener: 4 Hidden Details
The best fastener for insulated panels depends on length, metal compatibility, head design, and washer choice. Each one affects grip, corrosion, finish, and water sealing.
The Length Trap: Calculating For The Core
- Problem: Guessing length leads to short-shanking or crushed insulation. Threads that stop in the foam instead of the structure have weak pull-out strength.
- Rule: Stick to the Three Thread Rule—the fastener should go into the substructure by at least 1 inch or three full threads.
- Nuance: Insulated panels compress under load. A 4-inch panel might shrink by 1/8 inch during install, so add that margin when sizing fasteners.
- Application: Measure the panel skin, foam core, and substructure before picking a length. Don’t trust labeled panel thickness alone.
Material Compatibility & Galvanic Corrosion
- Science: Galvanic corrosion happens when different metals touch and moisture is around. Stainless screws in bare aluminum create an electrical reaction that eats away the aluminum.
- Risk: Carbon steel fasteners on Galvalume panels corrode faster because zinc and aluminum coatings react with exposed steel.
- Solution: Match fastener material to the panel.
- Galvanized or Galvalume panels: Use zinc-coated or ceramic-coated steel
- Aluminum panels: Go with 300-series stainless steel
- Result: Matching slows rust since the metals have similar electrical potential. That means fewer stains and a longer panel life.
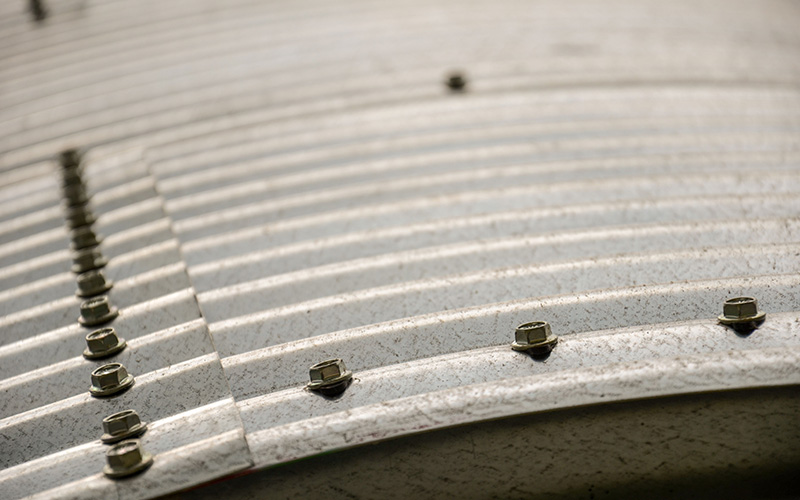
Head Style & Aesthetics: The Balancing Act
- Exposed Fasteners: Hex washer head screws are easy to drive and resist cam-out. Color-matched heads blend in on exterior walls.
- Concealed Fastener Systems: Low-profile or pancake heads sit below the surface, stopping telegraphing where bumps show through thin skins.
- Trade-Off: Exposed heads are quick to install and easy to inspect. Concealed fasteners look better but need tighter tolerances.
- Decision Point: Base the choice on visibility and panel profile. Flat panels reveal defects faster than ribbed ones.
The Washer’s Critical Role
- Function: The washer spreads load and seals the hole. It also prevents metal from distorting around the fastener.
- Material: EPDM washers beat neoprene. EPDM handles UV and stays flexible from -40°F to 250°F, so cracks are less likely over time.
- Installation: Torque matters.
- Over-torqued: Washer splits and leaks develop
- Under-torqued: Gaps let water in
- Best Practice: Tighten until the washer just bulges a bit, then stop. That’s enough compression without damage.
The Decision Framework: 5 Steps To Specify Correctly
Avoiding fastener failures takes a simple, repeatable process. This framework keeps the fastener selection in sync with the panel, structure, and site conditions.
1. Identify the substrate.
Match the drill point to the base material. Steel purlins need a Tek 3 or Tek 5 drill point, while wood calls for a coarse thread wood grip.
This lets the fastener drill cleanly and seat fully without stripping.
2. Account for thermal movement.
Insulated panels expand and contract as temperatures swing. Fasteners with long-life heads and bonded washers allow controlled movement, which cuts down on panel stress and washer failure.
3. Assess the environment.
Coastal or industrial sites expose fasteners to salt and chemicals. Zinc-aluminum or stainless grades like 304 or 316 resist corrosion since their alloys slow oxidation.
4. Verify load requirements.
Check published pull-out and pull-over values from tested assemblies. These figures show how the fastener holds up in the actual substrate and panel thickness.
5. Define the visual goal.
Pick concealed clips for hidden attachments or color-matched heads for exposed systems. This choice affects install time and future maintenance access.
Conclusion: The Standard Checklist
A fastener is part of a system, not just a single part. Each choice needs to fit with the panel, the insulation core, and the accessories that support the joint.
Use this checklist before any purchase or install:

- Base material: Match the fastener metal to the panel skin—coated steel with steel, aluminum with aluminum. This limits galvanic corrosion since similar metals react less in wet conditions.
- Coating or finish: Zinc-plated or organic-coated fasteners work best in rain or humidity. That slows rust and protects panel edges.
- Thread type: Self-drilling threads go with steel frames, self-tapping threads with wood or light-gauge steel. The right thread gives full contact and holds load.
- Length and diameter: Make sure the fastener passes through the panel and grabs the support. That’s how you get better pull-out resistance.
- Sealing elements: Use bonded washers, gaskets, or caps from the panel accessories set. These seal the hole and cut down on air and water leaks.
- Thermal movement: Allow expansion with slotted holes or flexible washers. This avoids panel stress as temperatures change.
Before buying, check manufacturer charts and load tables. These tools connect panel type, thickness, and accessories to the right fastener. That step cuts guesswork and supports long-term performance.
Frequently Asked Questions
What are the key factors to consider when selecting fasteners for insulated panels?
Match the fastener material to the environment. Stainless steel resists corrosion thanks to its chromium, which forms a protective oxide layer.
Fewer rust-related failures show up in cold storage or wash-down areas with the right fastener. Load capacity matters too—fasteners must handle wind, panel weight, and expansion or contraction as temperatures shift.
If the fastener can’t flex or hold load, panels will loosen over time. That’s a headache nobody wants.
Can you outline the main types of fasteners used for insulated panel applications?
Self-drilling screws are popular since the drill tip slices through metal skins and framing in one shot. That means faster panel installation and fewer tool changes.
Concealed fasteners hide within panel joints or profiles. They stay covered, so there’s less direct exposure to moisture—and that means a lower risk of corrosion at the attachment point.
What are the installation guidelines for fasteners in insulated panel systems?
Stick to the panel manufacturer’s spacing and torque limits. Correct torque is key—over-tightening can crush the panel skin, under-tightening lets panels move.
Proper torque keeps panels flat and sealed. Fasteners should align square to the panel surface, since angled fasteners reduce pull-out strength and can damage the core during installation.
How do environmental conditions influence the choice of fasteners for insulated panels?
Cold, humid, or coastal sites call for corrosion-resistant fasteners. Stainless steel or coated carbon steel usually work best in these spots.
These coatings slow down oxidation. That helps fasteners keep their grip, even after years of rough weather.
Temperature swings matter too. Fasteners with a bit of ductility can flex with thermal movement.
This flexibility eases stress on panel joints. It also lowers the risk of air leaks during those daily temperature shifts.
Want to Know More About Our Products?
View All Products Now