Eliminating Thermal Bridging: How to Stop Condensation and Heat Loss

Cold rooms, damp walls, and rising energy costs often trace back to thermal bridging.
This occurs when conductive materials—like steel studs or concrete—bypass insulation, transferring heat faster than the surrounding area. This creates cold interior surfaces, setting the stage for condensation and mold.
Eliminating thermal bridges requires continuous insulation and thermal breaks at critical weak points like wall joints and window edges. By blocking these paths, you cut heat loss, lower moisture risk, and improve comfort without relying on larger heating systems.
What Exactly Is Thermal Bridging And How Does It Work?
Insulation works like a down jacket. A thermal bridge acts like an open zipper—heat just slips through the gap instead of staying trapped.
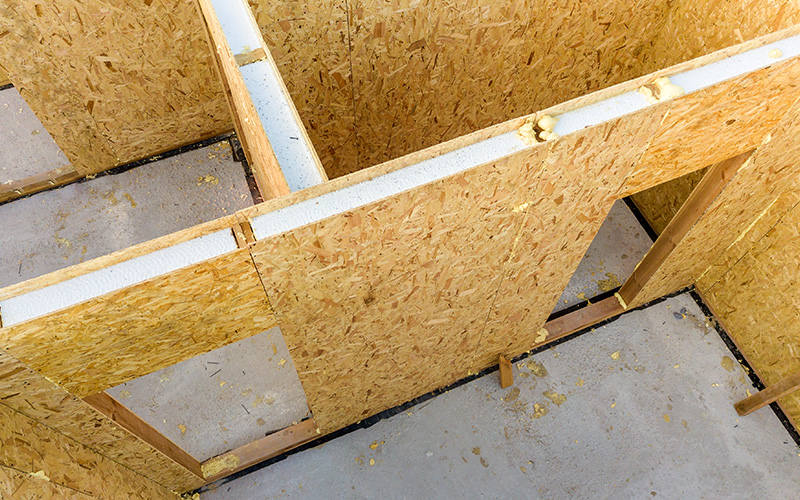
Thermal bridging happens when heat finds a faster path through conductive materials. Wood studs, steel framing, and concrete move heat better than insulation, so heat bypasses the insulated areas.
This process drives heat transfer from warm to cold surfaces. A thermal bridge forms where insulation breaks or thins—think wall studs, roof rafters, window frames, floor edges.
In cold weather, these areas feel cooler. This can lead to condensation when warm indoor air hits a cold surface.
Nominal vs. effective insulation values matter.
- Nominal R-value: the rating of the insulation alone.
- Effective R-value: the real performance of the full wall, including framing.
Steel studs conduct heat much faster than insulation. They can cut a wall’s effective R-value by more than half, which means higher energy use and uneven room temperatures.
The same issue shows up in U-values, which rise as heat loss increases. Thermal bridges reduce comfort because the structure itself carries heat across the building shell.
Why Should You Be Worried About Thermal Bridges? (It’s Not Just Energy Bills)
Thermal bridges matter because they cause energy loss, create condensation, and raise the risk of health and structural damage, even in buildings with modern insulation.
- Financial cost: Thermal bridges allow heat loss where insulation breaks or thins. Because heat moves faster through materials like steel or concrete, heating and cooling systems must run longer to hold the set temperature. That means higher energy use and higher bills, but no gain in comfort.
- Thermal discomfort: Cold surfaces form at thermal bridges, even when the room air feels warm. These cold spots pull heat from your body and make rooms feel drafty or uneven, sometimes just plain uncomfortable.
- Condensation risk: Condensation forms when warm indoor air hits a cold surface and reaches the dew point. Moisture collects on walls, windows, or hidden surfaces. Basically, normal indoor humidity levels turn into liquid water at thermal bridges.
- Health impact: Ongoing moisture supports mold growth, especially behind finishes where it stays unnoticed. Mold releases spores into the air, which reduces indoor air quality and can worsen asthma and allergies.
- Structural damage: Moisture trapped inside walls can cause interstitial condensation. Over time, this leads to wood rot or steel corrosion. The building slowly loses strength, and repair costs creep up.
Where Are The Hidden “Energy Leaks” In Your Building?
Hidden energy leaks form where the insulation layer breaks or thins, letting heat slip through solid building elements instead of staying inside the airtight building envelope.
- Geometric bridges: Corners and wall-to-floor junctions lose heat because more exterior surface meets less interior surface. This shape increases heat flow, creating cold bridge areas that attract condensation.
- Repeating bridges: Wall studs made of wood or steel repeat every 16–24 inches. These materials conduct more heat than insulation, so you get steady heat loss across the wall even when insulation fills the cavities.
- Structural bridges: Steel beams, concrete slabs, and cantilevers often pass from inside to outside. Steel transfers heat quickly, so heat gain in summer and heat loss in winter rise at these points.
- Fenestration: Windows and doors interrupt the wall system. Frames, spacers, and thresholds often connect directly to exterior cladding. These edges bypass insulation and create local cold surfaces.
- Exterior attachments: Fasteners, anchors, and supports tie exterior cladding back to structural elements. Each connection pierces the airtight building envelope, and over time, these small paths add up to measurable heat loss.
These locations matter because thermal bridges lower surface temperatures, which bumps up the risk of condensation on interior finishes.

How Can You Effectively Stop Thermal Bridging?
Thermal bridging stops when you block direct heat paths through framing and connections using a continuous insulation system and targeted thermal breaks.
- Continuous Insulation
Install exterior insulation as a single, unbroken layer over studs using rigid foam boards or mineral wool. This separates the framing from outdoor air and cuts heat flow through wood or steel. The wall’s effective R-value goes up, and condensation risk inside the insulation layer drops. - Thermal Break Pads and Structural Insulators
Add thermal breaks at steel beams, balconies, and slab edges by placing non‑conductive pads between interior and exterior steel. These pads use dense plastic or composite materials with low conductivity, so steel no longer carries cold indoors where moisture can form. - Advanced Wall Systems
Use insulated concrete forms or structural insulated panels where possible. These systems put insulating materials on both sides of the structure, keeping insulation continuous and heat loss low. - Fluid‑Applied and Specialty Coatings
Apply thin insulating coatings, including aerogel-based products, at complex joints and penetrations. These coatings fill gaps that rigid boards miss and protect small details that often cause hidden condensation. - Smart Fasteners
Choose stainless steel or plastic‑capped fasteners instead of plain steel. These fasteners reduce point heat transfer and help the insulation system perform better over time.
What Steps Can You Take During Construction Or Renovation?
Builders and homeowners can limit thermal bridging by planning insulation, framing, and air sealing as one connected system from design through renovation.
- Design: Specify continuous insulation (CI) in the building design. CI runs unbroken across studs and framing, blocking direct heat paths and keeping interior wall surfaces warmer.
- Framing: Use advanced framing with 24-inch stud spacing instead of 16 inches. Fewer studs mean fewer thermal bridges, reducing heat loss while still meeting structural codes.
- Penetrations: Reduce structural and mechanical penetrations through the building envelope. Each penetration creates a break in insulation, so you get steadier indoor temperatures and fewer cold spots.
- Exterior renovation: Add insulated sheathing during siding replacement. This places insulation outside the studs and covers wood framing, treating the main source of thermal bridging directly.
- Interior renovation: Apply a continuous insulation layer over existing studs before new drywall. This method works when exterior changes aren’t possible, though it might shrink the room a bit.
- Detail sealing: Seal rim joists, window gaps, and wall joints with spray foam or caulk. These materials block air leaks, so the air conditioning system doesn’t have to work as hard.
- System coordination: Size the air conditioning system after insulation upgrades. Better insulation techniques reduce heating and cooling loads, letting smaller systems handle humidity more evenly.
Is Eliminating Thermal Bridging Worth the Investment?
Eliminating thermal bridging is worth it because it lowers energy bills, stabilizes thermal performance, and reduces moisture damage over the building’s life.
- ROI: Continuous insulation and thermal breaks reduce heat flow through framing members, which can account for up to 30% of wall heat loss. Lower energy costs and steadier indoor temperatures are real benefits. Fewer cold surfaces also limit condensation, so you avoid repairs tied to mold and material decay.
- Energy Bills: Buildings with fewer thermal bridges waste less heat in winter and gain less heat in summer. HVAC systems run fewer hours, and you see smaller utility bills—not just short-term savings that disappear.
- Thermal Performance: Covering studs and slabs with uninterrupted insulation bumps up the wall’s effective R-value. The insulation performs closer to its rated level, since heat can’t sneak past through metal or wood.
- Energy Audit: Infrared scans and blower door tests often flag thermal bridges as clear loss points. After upgrades, follow-up audits usually show reduced heat leakage, which helps prove the investment paid off.
- Compliance: Building codes such as ASHRAE 90.1 now require continuous insulation in many climate zones. Meeting these rules during construction avoids costly retrofits later.
- Risk Reduction: Warmer interior surfaces limit condensation because moisture no longer meets cold framing. It’s cheaper to build it right than to fix mold issues later—honestly, who wants that headache?
Summary Checklist
Use this checklist to help guide your design and retrofit choices. Each item targets a spot where heat leaks out or moisture sneaks in.
- Spot cold areas at corners, wall studs, window frames, and balconies. These spots lose heat faster because framing or concrete replaces insulation. You’ll often see condensation here when the surface gets cold enough.
- Check the real R-value, not just what’s on the insulation label. Studs, fasteners, and slabs let heat sneak through, so actual performance drops. For example, a wall labeled R‑20 might actually act more like R‑13.
- Plan for continuous insulation (CI) on the outside. CI covers studs and floor edges in one layer. This blocks direct heat paths and keeps inside surfaces warmer.
- Add thermal break pads at steel connections. These pads use low‑conductivity materials, like fiber‑reinforced polymers. That way, steel stops acting like a highway for heat from indoors to outdoors.
- Seal air leaks before and during insulation work. Gaps around plates, penetrations, and joints let warm, moist air slip into cold cavities. You’ll notice fewer drafts and less hidden condensation if you seal them up.
Focus on studs, frames, balconies, and slabs—they’re notorious for cutting down your insulation’s effectiveness and creating major heat paths. Don’t forget air sealing, either; it’s key for limiting moisture movement.
Frequently Asked Questions
What are common examples of thermal bridging in residential buildings?
Wood or steel studs are classic thermal bridges because they run right through insulated wall cavities. Heat moves way faster through these framing pieces than it does through insulation. So in winter, you’ll notice cold patches on your walls—and in summer, those same spots can get warmer than you’d like.
Window and door frames also create thermal bridges, especially where the frame meets the wall. Concrete slabs that stretch from inside to outside, like balconies or porches, are another obvious path for heat loss.
What methods are used to prevent thermal bridging in wall construction?
Continuous exterior insulation blocks heat flow by covering studs, plates, and rim joists. It works because it keeps interior and exterior surfaces from touching directly. This keeps inside walls warmer and reduces cold spots.
Some builders use advanced framing methods, spacing studs farther apart and using fewer structural members. Fewer studs means fewer direct paths for heat to travel through the wall.
How does a thermal break function and where should it be implemented?
A thermal break uses a low-conductivity material, like rigid foam or plastic spacers, between conductive parts. It interrupts the straight shot that heat would otherwise take through metal or concrete.
Builders put thermal breaks at balcony connections, steel beams, wall fasteners, and window frames. You’ll end up with less condensation on surfaces and steadier indoor temperatures.
What are the dangers of air leakage in building structures?
Air leakage lets warm, moist air slip through walls and ceilings. When that air hits cold surfaces, moisture forms inside the structure.
This moisture can cause mold to grow. Over time, building materials might start to decay.
Air leaks also make your heating and cooling systems work harder. That means higher energy bills and rooms that never quite feel comfortable.
Want to Know More About Our Products?
View All Products Now