Cold Storage Installation Process Explained: Key Steps from Design to Construction for Modern Facilities
Cold chain demand keeps rising as food and drug shipments grow. Cold storage now supports daily supply, not just peak seasons.
This makes the installation process a time‑critical decision, not a side task.
Cold storage isn’t just a dry warehouse with cooling slapped on. It’s more like a sealed thermal system where insulation type, panel joints, and refrigeration layout all control heat flow.
Even small design gaps can cause condensation, higher energy bills, or floor frost. Cold air escapes, moisture sneaks in—suddenly, you’ve got problems.
Understanding the Fundamentals of Cold Storage Construction
Cold storage construction is a specialized building process that creates thermally controlled environments for temperature-sensitive products.
This work differs from standard warehouse construction. You have to control heat flow, moisture, and air leaks at all times.
Design choices directly impact energy use, food safety, and operating costs.
The Critical Role Of Thermal Efficiency In Warehouse Design
Thermal efficiency starts with the building shell. Cold storage design uses insulated metal panels with sealed joints, continuous vapor barriers, and insulated foundations.
These choices block heat transfer. Gaps and thin slabs create thermal bridges that drive up energy use.
For operators, better insulation means compressors run less and efficiency goes up.
The foundation matters just as much as the walls. Builders install slab insulation and proper drainage, usually sloped about 1/8 inch per foot, to prevent ice buildup and slab cracking.
This protects forklifts and racking in refrigerated warehouses.
During cold storage installation, teams use thermal imaging to find air leaks after panels are set.
This step helps confirm that the cold storage warehouse holds stable temperatures in daily use.
Comparing Key Insulation Materials for Cold Storage Panels
An insulated metal panel (IMP) is a composite building material. It uses an insulating core sandwiched between two metal facers to control heat flow.
Panel choice affects thermal loss, fire behavior, vapor barriers, and how well the insulation system prevents moisture and insulation gaps.
Differences Between Polyurethane (PUR) And Polyisocyanurate (PIR) Panels
Polyurethane (PUR) is a thermosetting plastic material that provides standard thermal insulation for cold storage walls.
Polyisocyanurate (PIR) is an advanced fire-resistant foam that offers superior thermal performance and safety.
PUR panels usually deliver an R-value of about R-6 to R-6.5 per inch. PIR panels reach about R-7 to R-7.5 per inch.
Since PIR resists heat flow more per inch, designers can hit the same thermal target with thinner panels.
Fire behavior is a big difference. PIR has a higher ignition temperature and lower smoke output than PUR.
In practice, this means safer performance where codes demand stricter fire ratings.
Both use steel facers that act as a vapor barrier when seams seal correctly.
This matters because moisture intrusion raises heat loss and can damage insulated panels over time.
Advantages And Disadvantages Of PUR And PIR Insulation
PUR panels
- Pros
- Lower material cost per square foot.
- Predictable thermal insulation for freezers and coolers.
- Easy to source in standard insulated metal panels.
- Cons
- Lower fire resistance than PIR.
- Slightly lower R-value, which may require thicker walls.
PIR panels
- Pros
- Higher R-value per inch, which reduces wall thickness.
- Better fire ratings due to stable foam chemistry.
- Slower flame spread and reduced smoke.
- Cons
- Higher upfront cost.
- Fewer thickness options in some markets.
Both materials need careful installation. Poor joints create insulation gaps and weaken vapor barriers, pushing up energy use.
How To Choose The Best Panel Type For Your Project
Go with PUR if you’re on a tight budget and standard fire codes apply. PUR fits many food storage rooms where wall thickness isn’t a big deal and costs matter most.
Pick PIR when fire performance and space are priorities. Facilities with strict codes, high occupancy, or thin wall limits get more from PIR’s higher R-value and safer fire behavior.
Whatever you pick, the insulation system has to stay sealed. Good joint design, tight fasteners, and continuous vapor barriers keep moisture out and panels protected.
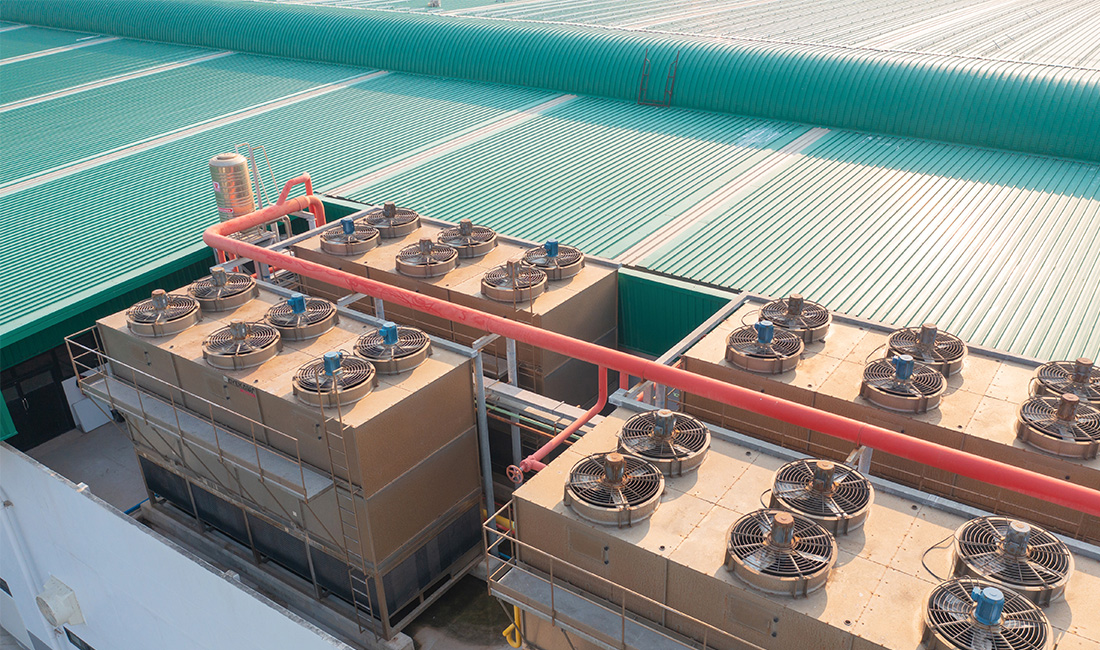
Selecting the Optimal Refrigeration System for Temperature Control
Definition: A refrigeration system is a mechanical assembly that removes heat from an enclosed space to keep a low temperature range.
This choice affects temperature stability, energy use, safety planning, and long-term costs.
It also shapes how well the refrigeration systems integrate with HVAC and heat recovery options.
Analyzing Ammonia, CO2, and Freon Refrigeration Systems
Ammonia (NH₃), carbon dioxide (CO₂), and Freon-based refrigerants dominate cold storage design. Each handles heat removal differently, changing efficiency and risk.
Ammonia has a global warming potential (GWP) of 0 and a high heat transfer rate.
Because ammonia absorbs heat quickly, it often delivers lower power use per ton of cooling. In practice, this supports stable temperature control in large rooms.
CO₂ has a GWP of 1 and works at much higher pressure than ammonia. That pressure allows compact piping, but it requires thicker steel lines and pressure-rated valves.
For the operator, this means tighter design rules but easier environmental compliance.
Freon is a broad group. Common types like R404A (GWP ≈ 3,900) and R134a (GWP ≈ 1,430) face phase-down rules.
These systems still show up in older or small sites because parts are widely available.
| Refrigerant | GWP | Typical Use |
| Ammonia | 0 | Large industrial cold storage |
| CO₂ | 1 | New, low-emission facilities |
| Freon | 1,000+ | Small or legacy systems |
Advantages and Disadvantages of Different Refrigeration Types
Ammonia systems are energy-efficient because ammonia moves more heat per pound than most refrigerants. This reduces compressor run time.
The tradeoff is toxicity, so you need gas detection, ventilation, and trained staff.
CO₂ systems avoid toxicity and meet strict climate rules. The downside is operating pressure, often above 1,000 psi.
This raises equipment cost and demands precise installation to protect temperature stability.
Freon systems cost less upfront and are easier to service. Most HVAC technicians know them already.
But there’s regulatory risk and higher energy use compared to ammonia in large spaces.
How to Choose the Right Refrigeration System for Your Needs
Large industrial cold storage often picks ammonia. Its low GWP and strong efficiency support steady temperature control across wide zones.
It also pairs well with a heat recovery system that reuses waste heat for offices or defrost cycles.
Facilities with strict environmental rules usually go with CO₂. This fits sites that need low emissions and clear compliance records.
For the user, this means fewer future retrofit demands.
Small commercial cold rooms may still use Freon. These sites value simple controls, smaller charge sizes, and lower initial cost.
Careful planning helps limit future changes as refrigerant rules tighten.
Step-By-Step Cold Storage Installation Process Guide
This process follows the construction timeline from ground work to system integration.
Each step focuses on temperature control, load strength, and airtight construction to support single or multiple temperature zones.
Step 1: Preparing The Site And Installing Underfloor Heating
Underfloor heating is a protective system that prevents the soil beneath the freezer from freezing and causing frost heave.
The construction team starts with site preparation. They grade the land, compact the soil, and confirm drainage paths.
Poor drainage traps moisture, which can freeze and lift the slab. That movement can crack floors and damage panels.
They install underfloor heating pipes above the soil and below floor insulation. These pipes circulate warm fluid, usually set between 5–10°C.
This temperature keeps the ground stable. For the operator, this means fewer floor repairs and longer slab life.
They also place vapor barriers and rigid foam boards. These layers block moisture and reduce thermal bridges that pull cold into the ground.
Step 2: Erecting The Structural Steel Framework
The steel framework defines the building shape and supports roof loads, panels, and refrigeration equipment.
Crews anchor columns to embedded bolts in the foundation to control alignment.
They assemble beams and bracing in a set order. This sequence controls sway and keeps tolerances within a few millimeters.
Tight tolerances matter because panel joints rely on straight framing to stay sealed.
Framing also sets door openings, loading docks, and roof clearances. Accurate framing allows dock seals, loading dock equipment, and doors to fit without field cutting, which reduces air leaks.
Step 3: Installing Insulated Panels To Create A Thermal Envelope
A thermal envelope is a continuous insulation barrier that separates the conditioned interior air from the external environment.
Crews install insulated metal panels on walls and ceilings.
These panels often use polyurethane foam cores with known R-values, like R-30 for freezer walls. Higher R-values slow heat gain, which lowers compressor run time.
They seal every joint with gaskets and food-grade sealants. This step blocks air and vapor movement.
Without tight seams, warm air enters, condenses, and forms ice.
Key focus areas include corners, roof-wall joints, and floor connections. These spots often create thermal bridges if left untreated.
Proper sealing keeps temperature zones stable.
Step 4: Pouring The Concrete Slab For High-Load Capacity
The slab pour usually follows wall panel installation. The panels act as edge forms and protect insulation during the pour.
Crews place rebar or wire mesh based on load plans. Cold storage slabs often rate for forklift loads above 6,000 pounds.
The mix design includes air entrainment and low water content. These traits limit cracking during freeze cycles.
After pouring, crews cure the slab for several days. Controlled curing prevents surface dusting and shrinkage.
For daily use, this means smooth travel for lift trucks and stable racking bases.
Typical slab layers include:
- Finished concrete surface
- Reinforcement steel
- Vapor barrier
- Floor insulation
- Heated subgrade
Step 5: Integrating Refrigeration Units And Cold Storage Doors
After sealing the envelope, technicians get to work on the refrigeration gear. They mount evaporators, run insulated pipes, and hook up control wiring.
Each refrigeration system matches its temperature zone. You’ll see setups for -20°C freezers or 2°C coolers, depending on what’s needed.
They check airflow patterns to prevent hot or cold spots. Balanced air keeps stored goods safe and helps stop ice from piling up.
LED lighting goes in now, since it puts out very little heat and sips electricity.
Crews install cold storage doors, dock doors, and seals. Tight gaskets and straight tracks block air leaks.
This cuts down on frost, saves energy, and keeps loading docks safer when things get busy.
Critical Considerations Before Starting Your Installation
Your early decisions shape safety, costs, and how things run every day. It’s smart to nail down the rules, permits, and long-term plans up front to avoid headaches later.
Ensuring Compliance With Safety And Health Regulations
Cold storage sites have to meet health and safety regulations before you even break ground. Food facilities usually follow HACCP plans and FDA food safety rules—those systems set temperature limits and require monitoring.
So, engineers set alarm points and logging systems before the equipment shows up.
Local building permits and fire codes aren’t optional. Most sites need NFPA 13 sprinkler systems and approved fire suppression systems that work in low temps.
For operators, this means less fire risk in insulated rooms where smoke doesn’t move fast.
Safety inspections need to cover ammonia or CO₂ refrigeration, emergency exits, and floor load ratings. Training staff on lockout procedures and confined spaces is essential since cold rooms limit how much you can move and see.
Environmental rules might also require spill controls to keep soil and water safe.

Planning For Future Scalability And Routine Maintenance
A feasibility study should check demand, power supply, and site selection limits. Designers plan for scalability by sizing electrical rooms and rack layouts so you can add chambers later.
When space and power are available, you can expand without shutting down.
Automation technologies help you grow. Conveyor controls and inventory management systems cut down on manual work and mistakes.
Operators get faster picking and need fewer staff hours.
Plan regular maintenance from day one. Clear aisles, roof access, and spare parts storage all make repairs easier.
Sustainability matters too. Roof mounts for solar panels and efficient motors help lower energy use.
Renewable energy options can shrink costs without changing how you work day-to-day.
Frequently Asked Questions
What are the essential design considerations for setting up a cold storage facility?
Design starts with the temperature range you need, like -20°F to 40°F. That choice sets your insulation thickness and refrigeration load.
Pharma storage usually requires 2°C to 8°C rooms and constant temperature logging. That keeps products stable and helps with audits.
Engineers size floors for point loads above 500 pounds per square foot to handle racks and forklifts. They plan airflow using ceiling-mounted evaporators and clear air paths.
This setup stops hot spots that can ruin inventory.
Teams also run a market analysis to estimate storage volume and turnover. This step guides room size and dock count, which can cut future expansion costs.
How do you select an appropriate location for a new cold storage unit?
Location is all about utility access, soil, and getting trucks in and out. Sites need three-phase power, potable water, and sewer capacity for refrigeration and defrosting.
That means fewer headaches from service interruptions.
Soil tests confirm bearing strength and frost risk. Builders often add heated slabs or vapor barriers in cold climates.
This helps floors avoid heaving and cracking over time.
Being close to highways and ports cuts transit time for food and pharma storage. Shorter routes keep things cold during loading.
What are the key phases of the cold storage construction process?
First comes site prep, grading, and pouring a reinforced concrete foundation. Crews install insulated metal panels after the slab cures to build the envelope.
This locks in air tightness early.
Next up: refrigeration, electrical, and control systems. Installers test compressors, sensors, and alarms under load.
This step proves the system holds setpoints before you bring in inventory.
Final steps are inspections, commissioning, and staff training. These confirm you’re up to code and ready to run things safely.
How can one ensure optimal insulation during the cold storage installation?
Installers usually go with polyurethane foam panels with R-30 to R-40 values for the walls and ceilings. Thicker foam means less heat sneaks in, so higher R-values really do matter.
That thicker insulation helps users cut down on energy bills. It’s a simple equation: less heat in, less cooling needed.
Crews seal every joint with vapor-tight gaskets and mastic. They’ll also put a continuous vapor barrier under the slab.
The vapor barrier keeps moisture from freezing inside the floor. It’s one of those steps that saves headaches later.
After startup, teams run thermal scans. These scans pick up leaks so crews can patch them before things get busy.
Want to Know More About Our Products?
View All Products Now